
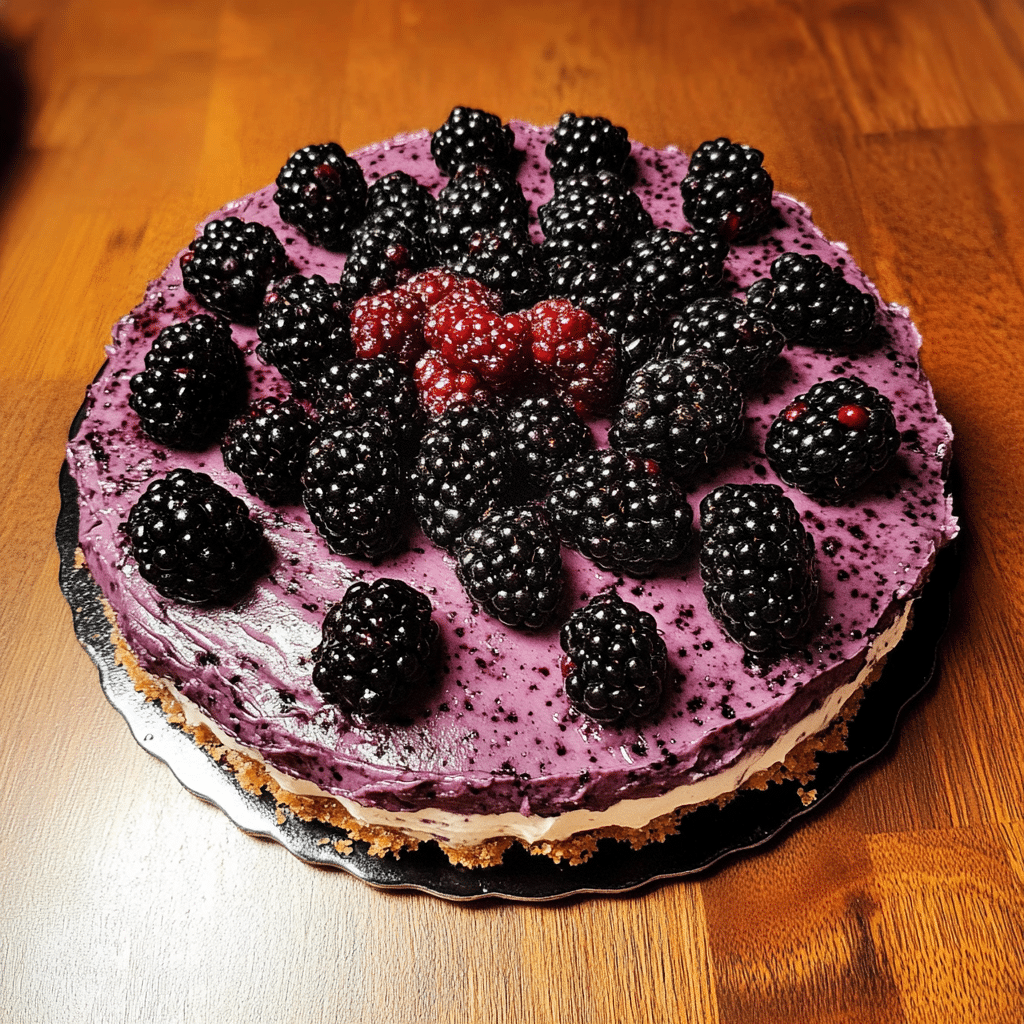
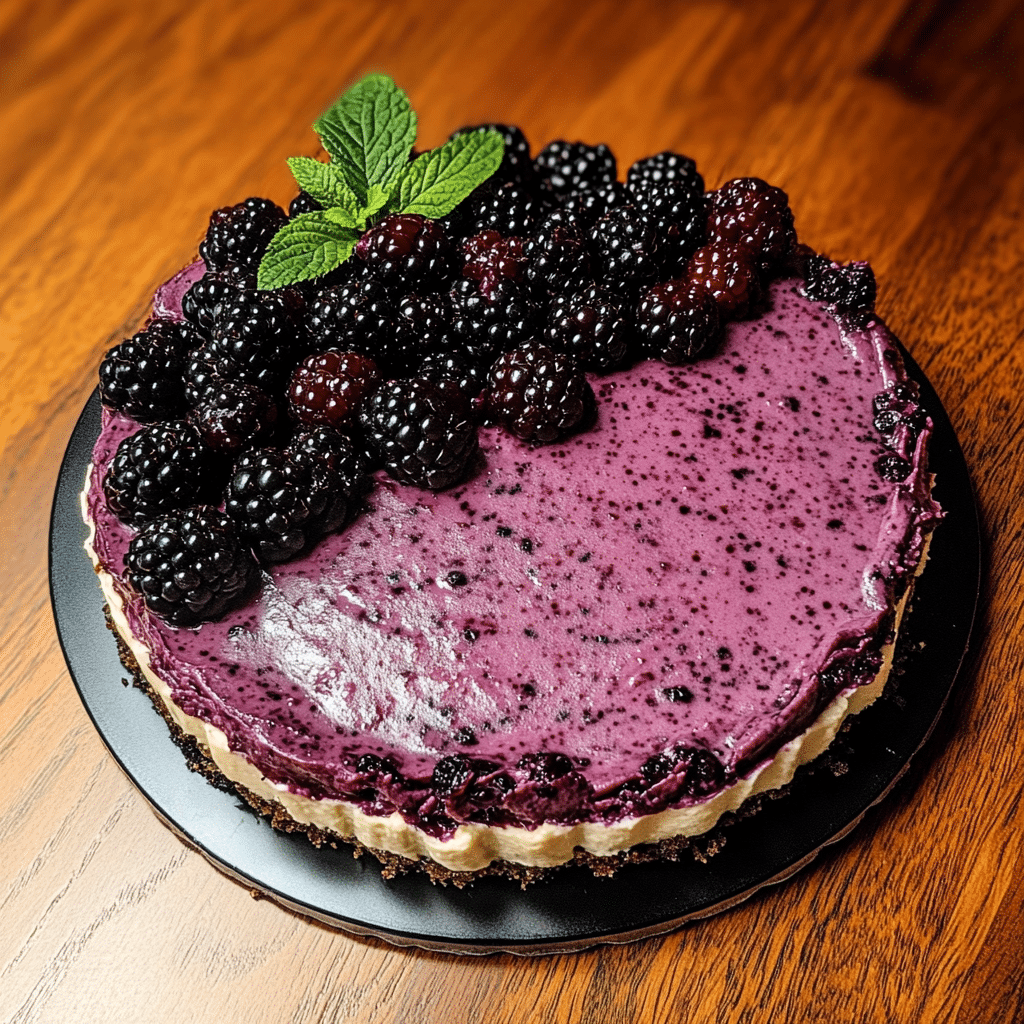
No-Bake Blackberry Sorel Cheesecake is a luscious, creamy dessert that combines the tart sweetness of blackberries with the floral, citrusy notes of sorrel. This no-bake treat features a velvety cream cheese filling infused with sorrel and a hint of vanilla, all atop a buttery graham cracker crust. Topped with a glossy blackberry compote or fresh berries, it’s an elegant and refreshing dessert that’s perfect for any occasion.
I first made this cheesecake for a summer gathering, inspired by the vibrant flavors of fresh blackberries and sorrel leaves. The no-bake method made it incredibly simple to prepare, and the end result was as beautiful as it was delicious. What I love most about this recipe is its versatility—you can experiment with other berries or herbs, use a chocolate crust for a richer flavor, or serve it in individual jars for a fun presentation. Whether for a celebration or a casual dessert, No-Bake Blackberry Sorrel Cheesecake is a show-stopping dish that will delight every guest!
Perfect for:
- Summer parties
- Holiday desserts
- Birthdays
- Gatherings with friends and family
- Blackberry lovers
Why You’ll Love This Recipe
Here are 10 reasons why this No Bake Blackberry Sorel Cheesecake will become your new favorite dessert:
- Fresh and Fruity: The blackberries bring a juicy, tangy sweetness that pairs beautifully with the creamy cheesecake filling.
- No Baking Required: With no need to turn on the oven, this cheesecake is a perfect choice for hot days or busy schedules.
- Smooth and Creamy: The cheesecake filling is luxuriously smooth and melts in your mouth, creating a perfectly balanced texture.
- Flavorful Crust: The buttery graham cracker crust adds a crunchy, flavorful base that complements the creamy filling.
- Eye-Catching Appearance: The deep purple hue of the blackberries against the white cheesecake creates a visually stunning dessert.
- Easy to Make: With just a few simple ingredients and minimal prep time, this recipe is a breeze to whip up.
- Make-Ahead Convenience: This cheesecake can be made a day or two ahead of time, making it perfect for stress-free entertaining.
- Versatile Toppings: You can customize the cheesecake with additional berries, fruit compotes, or even a drizzle of honey.
- Perfect for Any Occasion: Whether it’s a casual get-together or a special celebration, this cheesecake is the ideal dessert.
- Gluten-Free Option: Swap out the graham cracker crust for a gluten-free version to accommodate dietary needs.
Preparation and Cooking Time
- Total Time: 4 hours (including chilling time)
- Preparation Time: 30 minutes
- Chilling Time: 3.5 hours
- Servings: 12 servings
- Calories per serving: Approximately 400-450 calories
- Key Nutrients: Protein: 5g, Carbs: 48g, Fat: 25g
Ingredients
For the Graham Cracker Crust:
- 1 ½ cups graham cracker crumbs
- ¼ cup granulated sugar
- 6 tablespoons unsalted butter, melted
The Blackberry Sorel Sauce:
- 2 cups fresh blackberries
- 2 tablespoons granulated sugar
- 1 tablespoon lemon juice
- 1 teaspoon cornstarch
- 2 tablespoons water
For the Cheesecake Filling:
- 16 oz cream cheese, softened
- 1 cup heavy cream
- ½ cup powdered sugar
- 1 teaspoon vanilla extract
- 2 tablespoons sour cream
Optional Garnish:
- Fresh blackberries
- Mint leaves
Ingredient Highlights
- Fresh Blackberries: Provide a tart and sweet flavor that shines in both the cheesecake filling and topping.
- Cream Cheese: Forms the creamy base for the cheesecake, giving it its signature texture and flavor.
- Sour Cream: Adds a tangy depth to the cheesecake filling, balancing the sweetness.
- Graham Cracker Crumbs: Create a simple yet flavorful crust that complements the rich cheesecake filling.
Step-by-Step Instructions
Make the Graham Cracker Crust:
- Prepare the Crust: In a medium bowl, combine the graham cracker crumbs, sugar, and melted butter. Mix until the crumbs are evenly coated.
- Press Into Pan: Press the mixture into the bottom of a 9-inch springform pan, creating an even layer. Use the back of a spoon to pack it down firmly.
- Chill: Place the crust in the refrigerator for 30 minutes to set.
The Blackberry Sorel Sauce:
- Cook Blackberries: In a small saucepan, combine the blackberries, sugar, lemon juice, cornstarch, and water. Cook over medium heat, stirring occasionally, until the mixture thickens and the blackberries break down into a sauce.
- Strain (Optional): For a smooth sauce, strain the mixture through a fine mesh sieve to remove seeds.
- Cool: Allow the sauce to cool to room temperature before using.
Make the Cheesecake Filling:
- Beat Cream Cheese: In a large bowl, beat the softened cream cheese until smooth and creamy.
- Whip Cream: In a separate bowl, whip the heavy cream with powdered sugar and vanilla extract until soft peaks form.
- Combine the Two: Gently fold the whipped cream into the cream cheese mixture until smooth and well combined. Add sour cream and mix until fully incorporated.
Assemble the Cheesecake:
- Spread the Filling: Pour the cheesecake filling over the chilled crust and spread it evenly with a spatula.
- Add Blackberry Sauce: Spoon the blackberry sorel sauce over the top of the cheesecake. Use a toothpick or knife to swirl the sauce into the filling for a marbled effect.
- Chill: Refrigerate the cheesecake for at least 3 hours or until firm.
Serve:
- Garnish and Slice: Once set, remove the cheesecake from the springform pan and garnish with fresh blackberries and mint leaves. Slice and serve chilled.
How to Serve
Here are 10 serving suggestions for No Bake Blackberry Sorel Cheesecake:
- As a Light Summer Dessert: Perfect for hot days when you want a refreshing treat without the oven.
- With Whipped Cream: Add a dollop of fresh whipped cream to each slice for extra creaminess.
- For Special Occasions: Serve at birthdays, anniversaries, or holiday gatherings to impress your guests.
- With Extra Berries: Add more fresh berries on top for a colorful, juicy topping.
- For a Gourmet Touch: Drizzle a little honey or caramel sauce on top for an added layer of sweetness.
- As a Frozen Treat: Freeze individual slices for a cool, refreshing version of the cheesecake.
- With a Side of Sorbet: Pair with blackberry or lemon sorbet for a delicious contrast.
- For Afternoon Tea: Serve in smaller portions as part of an elegant afternoon tea spread.
- As a Gift: Package slices of cheesecake in gift boxes for a homemade treat.
- With a Cup of Tea or Coffee: A perfect complement to a hot beverage after a meal.
Additional Tips
- Chill for Best Results: Make sure to chill the cheesecake long enough for it to set properly before serving.
- Smooth Swirls: When swirling the blackberry sauce, use a gentle hand to avoid over-mixing.
- Room Temperature Ingredients: Ensure the cream cheese is softened to room temperature for the smoothest filling.
- Use Fresh Blackberries: Fresh blackberries will provide the best flavor and texture in both the sauce and filling.
Recipe Variations
- Mixed Berry Cheesecake: Use a combination of raspberries, blueberries, and blackberries for a mixed berry cheesecake.
- Vegan Option: Use dairy-free cream cheese and coconut cream for the filling to make this recipe vegan-friendly.
- Chocolate Crust: Swap out the graham cracker crust for a chocolate cookie crust for a richer flavor.
- Lemon Blackberry Cheesecake: Add lemon zest to the filling for a bright citrus flavor to balance the blackberries.
- Chai-Spiced Crust: Add a dash of cinnamon, ginger, and nutmeg to the crust for a warm, spiced flavor.
Special Equipment
- Springform Pan: For easy removal and neat presentation of the cheesecake.
- Food Processor: To crush graham crackers for the crust or puree the blackberries for the sauce.
- Electric Mixer: For beating the cream cheese and whipping the heavy cream.
- Spatula: To spread the cheesecake filling and smooth the top.
- Fine Mesh Sieve: To strain the blackberry sauce for a smooth texture.
FAQ Section
- Can I use frozen blackberries instead of fresh?
Yes, you can use frozen blackberries, but make sure to thaw and drain them before cooking the sauce. - How long does this cheesecake last in the fridge?
The cheesecake can be stored in the fridge for up to 3 days in an airtight container. - Can I freeze the cheesecake?
Yes, you can freeze the cheesecake for up to 2 months. Thaw in the fridge overnight before serving. - Can I use a different berry for the sauce?
Yes, raspberries or strawberries would work well as a substitute for blackberries. - How do I prevent the cheesecake from being too soft?
Ensure the cheesecake chills long enough to firm up. You can also add a little extra powdered sugar to the filling for more stability. - Can I make this cheesecake without the crust?
Yes, you can skip the crust and make a crustless cheesecake if preferred. - Can I make this cheesecake in individual servings?
Yes, you can make this cheesecake in individual cups or jars for a personalized treat. - How do I remove the cheesecake from the springform pan?
Run a knife around the edge of the cheesecake before releasing the sides of the pan to prevent sticking. - Can I use a different sweetener in the filling?
Yes, you can use honey or maple syrup as an alternative to granulated sugar. - What can I use instead of sour cream?
Greek yogurt or mascarpone cheese are good substitutes for sour cream in the filling.
Conclusion
No-Bake Blackberry Sorel Cheesecake is a luscious and sophisticated dessert that combines the tart sweetness of fresh blackberries with the floral, citrusy notes of sorrel. This creamy cheesecake sits on a buttery graham cracker crust and is topped with a vibrant blackberry sorrel glaze, creating a show-stopping dessert that’s as easy to make as it is to enjoy.
This no-bake recipe is perfect for warm days when you want a decadent dessert without turning on the oven. The filling, made with cream cheese and whipped cream, is rich and smooth, perfectly balanced by the tangy blackberry sorrel topping. Garnish with fresh berries, edible flowers, or a sprinkle of zest for a beautiful finishing touch. It’s a refreshing and unique twist on classic cheesecake that’s sure to impress!
I can’t wait to see how your No-Bake Blackberry Sorel Cheesecake turns out! Be sure to share your photos on Instagram and tag me—I’d love to see your gorgeous creations. Don’t forget to leave a comment and let me know how you made this dessert your own!